Friday, February 28, 2014

Accidental Socks

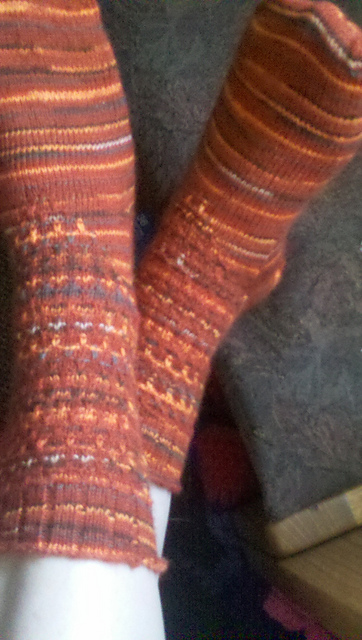
A while back, I decided I was going to make socks for my fiance (now husband).  He is constantly running holes into his and I was in a sock-making mood.

Well, I tried to adapt a pattern to fit his foot, but it wouldn't go over his heel.  He has bony, bony heels, and they protrude far from his ankles, and no matter what I tried I was out of luck.

So, after much agony, I finally decided that I would just have an extra pair of socks for myself that were a little too big and my husband's favorite color!

A few comments on the pattern: I used some sock yarn from Jo-Ann's that didn't really work with this pattern.  The striping wasn't profound enough, and so the dew drops looked a bit strange.  The pattern was pretty straightforward, though, and fun to knit.  I would just use a better quality yarn!

Ravelry Pattern | Ravelry Project

Thursday, February 20, 2014

Musician Baskets

Pattern Example
Previously, I wrote about the knit shawls for my lovely lady bridesmaids and my subsequent decision to make Cootie Catchers for my Girls.  Today, I'm going to write about the pattern I found for the musicians: Monogrammed Baskets!  They are all either newly married couples or college kids or both, and in need of storage, with little room.  These baskets were handmade and fit in little nooks and crannies to hold little trinkets.

Eric's Basket
I found this pattern on Ravelry.  I asked each of my musicians what their favorite colors were, and attempted to create a nice little basket for them each.

For Eric, the interlude/exterludist and the husband of one of my bridesmaids, whose favorite colors were green and blue, I made a dark blue basket with light blue, lime green, and pale green embellishents.  The light blue circle on the outside is a pocket.  I used the initial "A" because Eric and Hannah only recently got married, and their last name is Andersen, so I figured it would be nice to have a family basket.

Elizabeth's Basket
For Elizabeth, I was conflicted.  I've always called her Liz, but she usually goes by Elizabeth, her middle name, and her first name is Mary.  What to do?  I was also having some trouble with the colors because she asked for Purple and Yellow.  I was running out of nice combinations for the pocket and initial, and was conflicted on the initial itself.  So, I simply used all three initials, and made the E a little bigger cause she goes by that name.
Cami and Tyrell's Baskets

Cami and Tyrell, a married couple, said they liked brown and gold, so I combined the colors for each of them, and made Cami's more gold because that was her favorite color and Tyrell's more brown for the same reasons.  I added a little green and tan to add some extra color, and wha-la!


All in all, I was really happy with how these came out!
Has any one else tried these?  Any other baskets?  Thoughts?

Ravelry Pattern
Eric's Ravelry Project
Elizabeth's Ravelry Project
Cami's Ravelry Project
Tyrell's Ravelry Project

If you liked this post, you might like some of these ideas:


Saturday, February 15, 2014

Flower Girl Cootie Catchers

I posted a few weeks ago about how I decided to knit shawls for my beautiful bridesmaids.  It seemed like the perfect answer.

And then I realized that I would have to knit the gifts for the entire bridal party.

What in the world would I knit the groomsmen?  The musicians?  What about the flower girls!?

I'll eventually post about all of those, but for now, I'd like to share what I found for my flower girls:

Crocheted Cootie Catchers!

Ellie's Cootie Catcher
No, it wasn't technically knitting, but it was the same idea, and I'm sure my girls wouldn't mind.  You see, I had three flower girls.  My cousin Grace, age 9, and her sister Ella, age 5, as well as Randall's cousin Ellie, age 3.  They were all adorable, but trying to find something they all could like?!  A hassle.  And then I found this.

They were super easy to make, though I've never been very good at seaming, and I asked each girl what her favorite colors were in order to personalize it.  I also made my own version of the insets with those pretty color-waves in Microsoft word, so that each girl had a combination of each color she asked for.  I'm really happy with how they turned out in general.

Thoughts?  Any other cute flower girl gift ideas?

Ravelry Pattern
Grace's Ravelry Project | Ella's Ravelry Project | Ellie's Ravelry Project

If you liked this post, you might like these ideas:


Thursday, February 13, 2014

Shampoo Bar Soap

While I was on a soap-making spree, I came across this recipe from Frugally Sustainable.  Since I had been looking for an alternative to commercial shampoo, I jumped right on it!  Here's the finished project.
Here's the problem.  It doesn't work.  It leaves a greasy residue in my hair and makes it tangly.
Has anyone else had this experience?  What did you do about it?  Commercial shampoos dry out my ends, while my roots grease up every day, and I'm hoping to switch, but I'm at a loss!  Advice would be appreciated!

Tuesday, February 11, 2014

Cow Slippers

Last March, I made some slippers for my now brother-in-law for his birthday.  I was having a lot of trouble deciding what to make for him, since he's such a practical guy and wouldn't use much, but when I found these, I knew they were perfect!  He's had a thing for cows ever since he was a kid, and though these were little girl sized, I just adjusted using my fiance's foot as a guide, and wha-la!  The most appreciated gift I've ever given.  He uses them daily!

(The cats chewed the eyes off!)

Ravelry Pattern | Ravelry Project

Saturday, February 8, 2014

Tardis Netbook Cover: Because there's more room on the inside! (PATTERN)

A few years ago, I was running out of ideas for what to make my hubby (then boyfriend) for his birthday.  He hates things that aren't practical or use-able, and he's really not into hats, scarves, or mittens.  But that man, he loves his technology and his Doctor Who, so when I stumbled across this pattern for a Tardis Phone Case, I knew I had to make it.

The only problem?  He didn't have a smart phone.  He did, however, have a netbook, which, through a misunderstanding on ebay, was a baby purple that he wasn't so fond of, so I adapted the pattern to fit his netbook and, voila, here's the result!


Here is the adapted pattern:

Materials:

  • Aran weight blue, white, and black yarns (I used RedHeart brand)
  • size 4 double-pointed needles
  • darning needle
  • shiny button
Procedure:

Top:
Cast on 80 stitches with blue
Rows 1-7: (blue) k1, p1 to end
Row 8-13: (black) knit
Cut off black.
Row 14: (blue) knit

Windows:
Row 15: (blue) *p4, {k4, p2} twice, k4.  Repeat from * 4 times.
Row 16: *(blue) k4, {(white) k4, (blue) k2} twice, (white) k4.  Repeat from * 4 times.
Row 17: *(blue) p4, {(white) k4, (blue) p2} twice, (white) k4.  Repeat from * 4 times.
Rows 18-21: Repeat rows 16 and 17.
Row 22: (blue) knit
Rows 23-28: Repeat rows 16 and 17.
Row 29: Repeat row 16.
Cut off white.  Everything is in blue from here on out.

Body:
Rows 30, 32: purl
Rows 31, 33: knit
Row 34: {p4, k16} repeat 4 times
Row 35: knit
Rows 36-51: Repeat rows 34 and 35

Rows 52-95: Repeat rows 30-51 twice more.

Rows 96, 98, 100, 102: purl
Rows 97, 99, 101, 103: knit

Graft the ends together.  Tie ends away.  Add the shiny button and button loop for closure/as a light.
Optional: Stitch the words "Police Box" to the black strip.


Thoughts?  Please let me know if this is incorrect in any way!

Ravelry Pattern : Ravelry Project


Thursday, February 6, 2014

Bitty Target Flowers

In an effort to become more homey, I bought two one-dollar flower sets at target -- one for strawberries, and one for forget-me-nots.  They came in these little tiny pots with pellets of (surely under-quality) soil and packets of seeds.  The directions were pretty easy to follow, so I'm optimistic.  We'll see!

Has anyone ever used these before? What do you suggest I start planting with?


Tuesday, February 4, 2014

Homemade Sugar "Cubes"

I decided to attempt some sugar cubes.  I have a bag of sugar, but when you only want a spoonful or so to put in a cup of tea, it's much easier to grab a cube.  After I found this link, my experiment began.

The idea is simple, really.  You mix some sugar and water in a bowl, and then you bake them and cut them into cubes.

The execution was not so simple.

First, I made the mixture, but then realized I'd have to wait until the next day to bake it, so I threw it in the fridge.  When I took it out again (on the left), the crystals weren't maliable at all, and so I added some extra water (on the right).

This turned out horribly.  Everything dissolved immediately.  I lined the casserole dish with a double layer of parchment paper and kept adding sugar the the bowl until it had some what of a chunky consistency.  It was still too liquidy to score, so I decided to just bake it as is (left).

When it came out, it was still bubbling (left).  This was a bad sign.  Then, I discovered that it was stuck.  The mixture had oozed out of the sides of one piece of parchment and then around behind the other piece of parchment, coated the bottom of the dish, and was now locking everything together.  Great.  Deciding that removing the concoction at all was better than dumping it all down the sink, I opted to try double boiling (right).

The results?  Well, you can see for yourself.  It all came out in a glop with parchment paper stuck all throughout the insides. I pulled at it, essentially removing shards of the sticky substance to use as very non-cubical sugar cubes.  Effective, essentially, but a mess and not at all worth it.  I advice going to the store!


Has anyone else done this?  Have you been successful?  What am I missing?


Saturday, February 1, 2014

Basic Soap Recipe

If you've been following this blog, you know that on Tuesday, I posted about How and Why you should make your own soap.  Today, I'm going to follow up with my favorite basic soap recipe.

This recipe provides a pretty good amount of lather (from the castor oil), a nice cleanse (from the olive oil), and a bit of moisture so your hands aren't left crusty (from the coconut oil).  This is a hot-process soap.

Ingredients:

  • 6 ounces of water
  • 2.75 ounces of lye
  • 12.5 ounces of olive oil
  • 6.25 ounces of coconut oil
  • 1.125 ounces of castor oil
  • Essential Oils (as desired)
  • Colorants (as desired)

You'll also need some supplies:

  • Hand blender
  • Crock pot (about a quart)
  • a plastic shopping bag or other liner
  • a sturdy box (I used an old cardboard box from those 8-set yoplait yougurts)
  • a scale (to get precise measurements)
  • a soap-only spoon
  • a heat-resistant glass container
So, now that you know what you need, here's the process:

  1. Measure out your oils and melt them together in the crockpot.
  2. Measure out your lye and water.  Make sure the water is cold and, very slowly and with caution, add the lye to the water bit by bit.  The lye will cause a heat reaction, so this should be a carefully controlled addition.
  3. At this point, I add different colorants to each batch.  This is completely optional, but always use specific soap dyes for this (they're not that expensive).  If you choose to use colorants, read the label to see if they are to be added to the water (ie the lye solution) or the oils (what's cooking in the crockpot).  In fact, some are best to be added at the end.  Read up on your particular colorant.
  4. When the oils and the lye solution are about the same temperature, slowly pour the lye solution into the oils.  At this point, any plastic ware or wood you are using (such as a spoon) should never again be used for food.  The lye will leave traces in wood and plastic.  Stainless steel, glass, and ceramic are safe.
  5. Use the hand blender to blend the mixture to trace.  Basically, it should be the consistency of pancake batter.  When you lift the blender out of the mixture, it should leave convex trails of mixture along the top.  For this recipe, it should take 10 minutes or more.
  6. Then, you put the lid on and just let it cook.  With my crockpot, this recipe takes about an hour and a half.  You should see the entire mixture crawl up the edges and fold over into the middle.  There will be a pool of glycerin in the middle.  You can either collect this or stir it back in.  Everything should have turned whiteish foamy, and then eventually go back to being transparent at least in some places.
  7. If you're adding essential oils, add them at this time and stir them in well.
  8. Pour the mixture into a plastic bag and lay it inside the box you are using as a mold.  Let it harden for at least 24 hours, then remove it, peel off the plastic bag, and cut it into bars.
Here are a few bars that I have made recently.  Each color signifies a different combination of essential oils.